

Manual Station Installation
- Laptop, Computer (ethernet & USB), Monitor, Keyboard, Mouse
- Part Fixture
- Part to be inspected should be consistent positionally for each capture.
- Use tape to outline or possibly a more involved custom bracket to hold the part.
- Good / Bad parts ready to capture – Need at least 20/each for learning process.
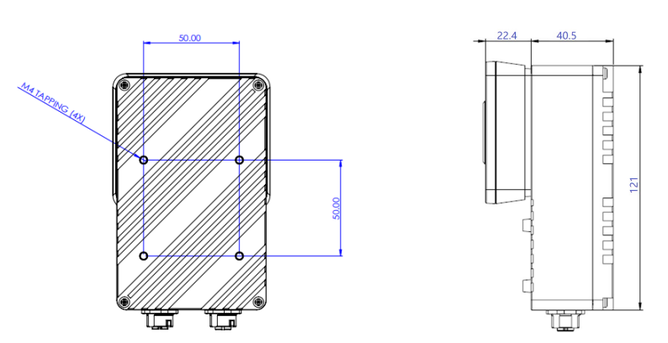
- Mount the OV20i
- Mount using a standard tripod mount to test, but a custom mount should be designed using the purple connecting plate provided
Connect to OV20i on Windows 10 and 11
- Open Settings
- Select the Network and Internet Option
- Go to Ethernet and select.
- The default Ethernet IP assignment will be Automatic (DHCP)
- Select Edit option – select the IP settings option “Manual”
- Set IPv4 to “on”
- Enter the laptop recommended IP address and Subnet mask. Select save.
- Note: No Software is required. It is preloaded on the OV20i.
Software Guideline
1 - Create a Recipe
2 - Imaging Setup
3 - Set up the Aligner.
4 - Set up ROI Block (region of interest)
5 - Setup the Classification Block
6 - Setup the IO Block
7 - Runtime
- A recipe can generally be described as an inspection task. You can create as many recipes as you want to inspect different parts, or different sides of the same part. Each recipe has its own imaging setup, alignment block, ROI block, classification block, and I/O block.
- You can only have one recipe active at a time. You need to activate a recipe before you can edit it. Note: While editing a recipe, it will no longer be able to perform an inspection…. Offline Editing….
2 - Imaging Setup
- Getting a good image is key to a good inspection. Spend some time choosing the right lighting, angle, distance, focus, exposure, and gain. Choose the trigger type that best suits your application: Manual or Hardware trigger.
- Fine Tune each setting. You can use the arrow keys to fine tune the slider bars for each setting.
- Closer is better. This is because you get more pixels on the part, so the AI has more data to work with.
- Well lit. The more lighting that is coming from the OV20i, the less ambient lighting matters. We want to reduce the effect of day vs. night, weather, and shadows from people or machines.
- Keep the object in focus. This creates a crisper image. You can use the focus slider to accomplish this. When objects are in motion, you also need to consider motion blur. The higher the exposure, the brighter the image, but the more motion blur there will be. For fast moving objects, lower the exposure and increase the gain.
- For static objects that don’t move, make sure to raise exposure to really distinguish the item from the background.
- Reduce glare. Glare means that certain parts of the image are washed out. We can’t perform inspections in washed out areas. There are several ways to avoid glare.
- Avoid pointing the camera directly at the object. Instead angle the camera at 15 degrees, so there is no direct reflection.
- Photometric lighting mode. This cycles through the lights and digitally stitches the image together to reduce glare.
- Terminology
- Image Rotation: Option to flip the image upside down.
- Exposure (ms): This increases the time the aperture is open, which makes the image appear brighter. On the other hand, if the object is in motion, it will make it appear blurrier.
- Auto White Balance: White balance is hard to set manually. Keep auto white balance on while you are setting up…once you are happy with the color…switch this off. If you are not happy with the auto balance color, you can put something with a bright color in the frame and it will automatically adjust and then you can turn it off.
- Gain: This brightens the image digitally, but increases noise (static) in the image
e.Focus: This sharpens the image - LED Strobe Mode: This only turns on LED lights during capture, we recommend this mode to conserve the lifetime of the LED lights. It also appears less bright to people around.
- LED Light Pattern: From here you can individually control the LED lights.
- LED Light Intensity: This is how bright the LED lights are. We recommend you turn this up to 100%.
- Photometric: This cycles through the LEDs and digitally stitches the image together….to reduce glare and shadows. Additional latency is added for
- photometric lighting. Do not use this mode if your part is moving during capture.
- Manual Trigger: This mode captures new images from HMI
- Hardware Trigger: This mode captures new images when triggered by the external input pin.
3 - Set up the Aligner.
- The aligner block finds an object of interest in all incoming images. You can use an Aligner Block before a ROI (region of interest) Block to make the defined inspection regions dynamic and adapt to the current orientation of the object.
- Template Regions
- Use one or multiple template regions to define which parts of the object to use to determine the object’s orientation.
- Include parts of the object that will be present in a consistent way across all incoming images and in all parts of the field of view.
- Avoid including regions that will not be consistently present in all images.
- Avoid including regions that will show up differently when the object is present in different parts of the field of view
- Edge Sensitivity
- Use the edge sensitivity slider to control how many edges you want to show in the template regions. Higher edge sensitivity will show more edges in the template regions.
- Adjust edge sensitivity to a value where you can pick up all the edges that will consistently show up in all images and exclude all other objects.
- Rotation Range
- Represents the number of degrees the object can be rotated and still be recognized by the aligner.
- Rotation values are relative to the template image….0 degrees.
- Limit the rotation range to speed up the Aligner Block’s inference time.
- For symmetric objects, limit the rotation range as the object looks the same under different angles of rotation…180 degrees is recommended.
4 - Set up ROI Block (region of interest)
- Here, we break up the inspection task into inspection types and inspection regions. Each inspection type can have as many inspection regions as you would like. For example…if you want to inspect 10 screws and 5 holes on a printed circuit board, you could create 2 inspection types and name them: “screws” and “bolts”. Then create 10 screw inspection regions: “screw1”, “screw2”, “screw3”, etc., then create 5 bolt inspection regions and name them: “bolt1”, “bolt2”, “bolt3”, etc.
5 - Setup the Classification Block
- Define the classes – Good/Bad, Dent/Scratch/Hole/Texture Issue/Pass
- You can define as many classes as you would like. The caveat is that you need 20 images per class minimum for a model to be effective. Each inspection type has its own set of classes.
- Dataset Collection
- Ensure that the features that differentiate the inspection region between multiple classes are clearly visible in the image to be able to train a performant classifier.
- To create a highly performant classifier, you should collect data with these principles in mind.
- Diverse – Collect images under conditions that represent all the different variations you expect to see in production. Changing ambient lighting, placing objects in different places in the field of view, etc.
- Label Consistently – Ensure that all images are labeled correctly and consistently. Check this through the “View All ROIs” functionality.
- Large in Number – The more images (diverse) you provide the classifier to learn from, the better it can learn.
- Settings
- Number of Iterations – How many times we show the labelled images to the model to help it learn.
- Finish Training Early – If the model has been at 100% accuracy for at least 20 consecutive iterations, you can consider using Finish Training Early to stop the training process.
- It is highly recommended to let the model train completely to get a robust model.
- What should you do when the reported training accuracy is low?
- Check the image labelling through View All ROIs to ensure that all images have been labelled correctly and consistently.
- Use View All ROIs to ensure that the ROI belonging to each class is visually distinct from ROIs belonging to other classes.
- Increase the number of iterations and train the model.
- Add more images to the training dataset and train the model.
- How to know if you have a good model and what to do when you encounter model mistakes?
- Use the Live Preview mode to test the algorithm. Simulate all different variations you expect to see in production and verify that the algorithm is performing accurately and reliably.
- If you encounter a situation where the model is inaccurate or unstable, take a few images representing the failure scenario, add the images to the training dataset and train the model again.
- Dataset Collection
6 - Setup the IO Block
- Either Manual Trigger or Hardware Trigger – Setting up the right I/O for your inspection is usually highly customized integration. We use NodeRed to make this easy. With NodeRed you can set up discrete I/O or use industrial communication protocols. You can perform actions based on the prediction of the class, the confidence of the prediction, alignment not being found, alignment match angle, and more.
- Input – There are two ways to capture images…setup these modes in the imaging setup.
- Manual Trigger – Captures new images from the HMI.
- Hardware Trigger – Captures new images when triggered by the external input pin. In the hardware trigger mode, captures and inspections always happen except during recipe editing.
- Output – The OV20i has a node red-code I/O builder right in the platform.
- If alignment match angle is > 10 degrees
- If alignment not found
- If any prediction is CLASS_NAME
- If any prediction is CLASS_NAME and confidence > 80%
- Simply remove the options that you don’t need and click “Deploy” button. You can remove them by clicking them and then hitting “Backspace.”
- Input – There are two ways to capture images…setup these modes in the imaging setup.
7 - Runtime
- Once you have finished training your AI model, you will want to run it in production. After training, the models get automatically deployed. Runtime happens in different ways depending on your trigger mode.
- Manual Trigger – In the HMI you can click “Capture” and this will perform capture, inspect, and save the results.
- Hardware Trigger – Captures, Inspection, and saving happens at all times except during recipe editing.
|
Quantum Automation is here to provide factory application understanding through indexing machines, rotary indexing tables, on the fly inspections, and custom brackets to help provide the final solution. |

|
C-OVE01-ICAM520-01 |
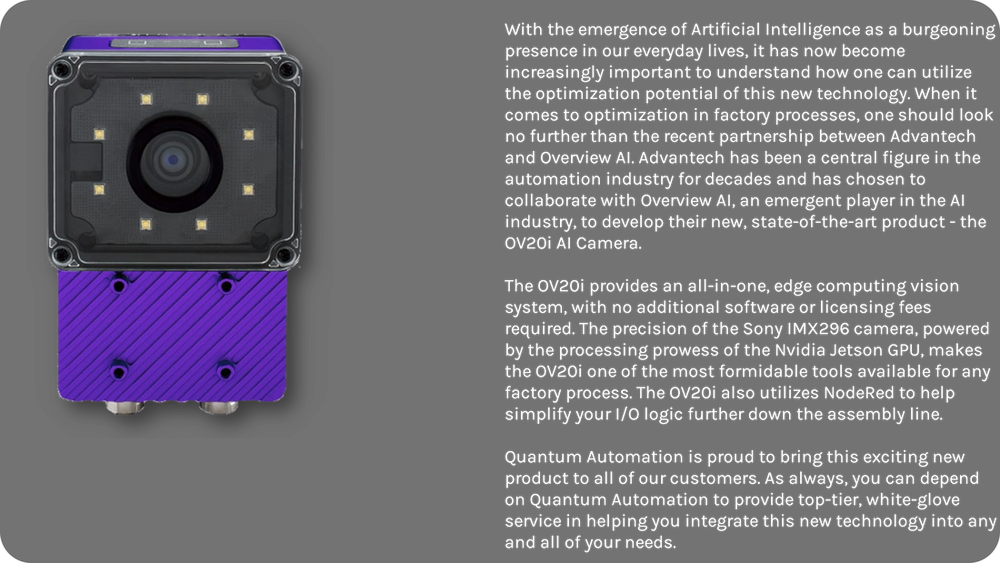
Advantech - ICAM 520 Computer NVIDIA - Jetson GPU SONY - IMX296 Camera OVERVIEW - AI GUI Quantum Automation - Proof of Concept |
$7500 |

|
Or call in Monday - Friday: 7am - 5pm PST 714-854-0800 |